DYLI.SH

My name is Dylan. I design things.

Introducing Modular  

I’ve long been bothered by grid systems/frameworks that were either too opinionated or solve too specific a case with way too much hand waving and kata. So like all frustrated people with a penchant for development “I wrote my own.™”

Goals

Initial Features

But this isn’t ‘Modular’ like, say, Müller-Brockmann’s layout systems…

Well smarty pants, I want to work on that. My next goal is to refine the current features and introduce an easy way to declare heights at different resolutions.

Finally

First, this system is used here at Groopt and has made life way easier and we hope it helps you. Second, we’ve built our products off of the hard work of other people’s open source projects, and we hope to give back in the same manner. Lastly, Please use it, please break it, then fix it, and maybe open a pull request. :D

The Goods

https://github.com/dylan/modular - Check it out here.

https://github.com/dylan/modular/issues - Contribute here.

OSX, Vagrant, Docker, and Sinatra  

Lately I’ve been reading a bit about how people are using Docker to run apps in high isolation and portability with low overhead, Vagrant for easy to replicate dev environments and speedy setup (read: no more nasty large images to download and update when all your co-workers want the same VM). And since we have a fun little project requiring a special service in the works that also requires some portability (for dev and production), I took it upon myself to try my hand at running a simple (seriously, I copied it off their front page) Sinatra demo, inside of a Docker container, inside of Vagrant, on OSX.

Now, for the sake of posterity and perhaps helping the random person out there with a similar mentality and technical environment as I… Let’s see how I did!

Docker Initial Considerations

Setting Up Vagrant and Docker with a Vagrantfile

Shimmy on over to http://downloads.vagrantup.com/, grab the relevant tag/package for your system and install it. Once installed, create a directory you can use for your Vagranty goodness (for the sake of this guide we’ll be using ~/vagrant/.) This will be a shared folder that we can access from inside the VM, the idea being that you’ll be creating some config files in here and accessing them once the VM is up.

Inside this new folder go ahead and drop this Vagrantfile. Vagrantfiles are how Vagrant knows what sort of VM to spin up. If you read this short ruby script (all Vagrantfiles are Ruby, which is nice) you’ll see a few things happening. * config.vm.box = "raring" - is the name of our box * config.vm.box_url - sets where Vagrant will fetch the box for Ubuntu Raring * config.vm.forward_port - is where we tell vagrant that we want to take the VM’s local port 5000 and forward to the host’s port 5000 * config.vm.customize - is where we’d define any special attributes for the VM we’re starting. In this case I wanted to make sure we had 512mb of ram (mainly so it’s procured a bit quicker, this could be tinier in all honesty) * There are a few lines checking if a .vagrant file exists, so we don’t run some installation instructions every time we start up the vm. * I’ve broken each command we want to run out into a string which we’ll concatinate and then pass to… * config.vm.provision - This takes the string we pass it and runs it in the shell as soon as the VM is booted.

Now that we understand it let’s fire this puppy up. Inside our ~/vagrant/ folder run:

$ vagrant up

As the fireworks happen you will notice a couple things. Vagrant will download the image we specified in our Vagrantfile, run the scripts we passed to config.vm.provision. Eventually you’ll be left at your prompt where you started. So let’s see if this thing works. In your terminal run:

$ vagrant ssh

If things are up and running it’ll open an SSH session into our fresh VM and we’ll be able to test things out.

Our first check will be to see that Docker was installed correctly. Run the following:

$ which docker
/usr/bin/docker

It should return the path to the Docker binary. Which leads us to our next step.

Building Our Sinatra Image With A Dockerfile

Go ahead and grab the Dockerfile we’re going to use and put it in ~/vagrant/ so that it’s shared with our VM. Take the time to open and read the Dockerfile while you’re at it so you both understand what we’re building and also so that you can see how simple these are to create.

This is what it will do: * FROM ubuntu - Tells docker what image to use as our starting point. * RUN apt-get install -y ruby rubygems git - RUNs this command to install ruby, rubygems, and git. * RUN git clone https://gist.github.com/11d45cb1767629962c5f.git /opt/* sinatra/ - Clones the gist to our sinatra folder where we’ll run our server script. * RUN gem install bundler - Kicks off the bundler install so we can grab any other gems we need (namely sinatra). * EXPOSE :5000 - Exposes port 5000 to the host OS * RUN cd /opt/sinatra && bundle install - Changes directory into our Sinatra folder and on completion installs all the gems we need. * CMD foreman start -d /opt/sinatra - This is a critical piece of the puzzle. This is what Docker runs at the completion of the build. The last CMD in the Dockerfile is the only CMD Docker cares about, and when we provision an image later it will cache every step it’s completed before (which makes it real fast), and finishes by running that final CMD.

Let’s try and build an image. Run this on your VM:

$ sudo docker build -t sinatra /vagrant/.

Docker will procede to download the base image, and run the instructions in our Dockerfile on said image, and store snapshots of each step in the process. Provided everything then went well you’ll see something like this at the bottom:

---> Running in <some other hash>
---> <some hash>
Successfully built <some hash>

We can now fire up our Sinatra container by entering the following:

$ sudo docker run -d sinatra
<container id>

When the container is provisioned successfully it will return a container id. Now that it’s up and running let’s try it out. Browse to localhost:5000 and you should see hello world. If so then you have met with great success! Before we leave here are a few usefull commands to make use of: * sudo docker ps -l - Lists all running, or the most recent containers * sudo docker kill <id hash> - Take one of the ids you’ve found from ps -l and shut it down * sudo docker restart <id hash> - Same as the prior command except restart the container * sudo docker images - Lists all the local images you have at your disposal

Further reading

Oblivion: Interactions and Aesthetics  

Universal Pictures

I saw Oblivion last night. As Joseph Kosinski’s movie unfolded it took us on a journey that provoked reflection on society, nature, morality, what it means to live, and how a man can die better. Good sci-fi will do this. It’s design and aesthetic however, are what I think had the biggest impact on me.

Planet Porn

Washington DC
Universal Pictures

I was first struck by the beauty of our ravaged planet. Through masterful cinematography and post production each shot was magnificently composed and showed a depth typically lacking in movie backdrops. I’ve always had a soft spot for gorgeous and surreal vistas; and my early attempts at concept art and matte painting for games I think allowed me to sate that interest growing up. With journeys into painting scarce these days the views in this movie are magnificent, compelling, and leave me in awe of the talented production team.

New York Street Jack's Haven Shore
Universal Pictures

Despite it’s barren state, I was left wanting to be transported there to explore and discover it’s mysteries.

Design Before It’s Time

Another dimension of this film the impressed me was it’s design. Everything from the living quarters to the UI. There was reason, function, and purity of form at every turn. In today’s world you only see such a beautiful harmony of things manifested as concepts, exhibits, and in this case, fiction.

Sky Tower
The sky tower acts as a command center, a garage, landing pad, and living quarters. It's occupants have some of the best views in the world despite their grave situation.
Work station
A commanding view of the surrounding area. The perfect spot to watch departures/arrivals. Clean and spacious. I wish I could sit there and sip green tea while I work.
Universal Pictures

UI That Is Both Fresh and Relatively Low on Greeble

One of my pet peeves is greeble. If you’re familiar with sci-fi movies than you’ve seen all the fake antennas and parts they tack on to the models and weapons to make things appear more complex. I’ve wished for movies with more thought put into the science and less effort in the fluff, and Oblivion delivers in spades.

Top View of table
At-a-glance status indication.
Universal Pictures

The usual sci-fi noise is refreshingly absent in this movie, we can feast our eyes on UIs where simplicity and function prevail. Even in the short glances we have at the screens of Oblivion, the audience can learn about what’s going on. We empathize with the characters as they interact with the tools. Most movies cannot boast of UI clean enough to contribute to the story in a meaningful way like this one.

Top View of table
Universal Pictures

These functional interfaces spread throughout the film really leave me wishing I could interact with them or that the apps I work with daily could be this smooth.

Universal Pictures

The Magician

One of the people behind all of this inspiring UI work is the imminent Mr. Munkowitz. You may recognize his work in Tron II, and he definitely left his mark on Oblivion. Make sure you check out his site and reels if you can’t get enough.

Universal Pictures

On the 11th Principle of Good Design  

I believe we need more design writers, and that we need more designers speaking their minds and advancing the field. With that in mind my ears perk up when I see articles with interesting titles ie:“The 11th Principle of Good Design”. My interest soon turns to the feelings of dissapointment and the general mood of a stodgey curmudgeon when I start bumping into ideas I do not agree with. Alas, that’s the way the world works, and in the spirit of education, challenging my own paradigms, and generally bettering the trade as a whole I feel compelled to speak up.

Where I tend to agree with Rams’ principles in all cases while judging a design (which I think was his point when devising them), I do not agree with Wells’ assertions that Rams’ principles are flawed because they are old and do not consider software, and that iteration is a key indicator of good design.

Firstly, design is the engineering of solutions to a problem, it is timeless, it’s not medium/industry centric so the software/age thing is irrelevant.

Secondly, and maybe I’m just getting lost in the semantics but the author is also saying that it is impossible for a designer to devise and deliver a solution correctly on the first effort. Example: If I want a logo which consists of a black circle with a QR code in the center, that must fit in the lower right hand corner of a stop sign, and I need it in the next hour. According to the author’s perspective, if there weren’t 30 drafts and the designer being open to improvement at every turn it violates his 11th principle and thus, is not good design.

I will take deliberate/considerate/responsible effort any day over furious iteration for iteration’s sake. But I will also concede the point that while you may knock efforts out of the park from time to time, any designer worth their salt will be humble and open to improvement and reflection, and that a bad designer never listens to feedback.

In short, this article touches on several correct premises, but is flirting with what maybe should become the real 11th principle.

A good design is effective. (Sometimes it just takes time to find the right solution.)

On Open Sourced Textmate  

The day after Textmate was open sourced, several friends and various others started throwing around the idea that Textmate was as good as dead. I will say this, in the days following there have been two new updates, that’s a much higher frequency than in the past. With these releases we get fullscreen support, bundle/theme click install from finder, and forced 10.7 support (and all the awesome that brings).

If this is what an “over” or “dead” Textmate looks like, I hope it stays dead.

My Equalized Headphone Setup  

Yeah

A lot of people search for those perfect headphones. The ones that you plug in, put on, and the sound just flows like notes off of the harp of Apollo. What people don’t know is that this search is usually too haphazard. Most just don’t know that there are tools and techniques to help them get extremely good audio from perfectly inexpensive “mid-range” headphones. Here I show you my best efforts to do so.

Your Ears and Your Headphones

First, why are we doing this? Everyone has different sized ear canals. This is why ear plugs come in different sizes. This size variance coupled with different materials, headphone materials create a dizzying amount of possibly percieved audio qualities. Some sound tinny, some have booming unrealistic bass, or muddy mids. One pair of headphones straight out of the box for one person may sound like garbage, while those same cans sound like gold to another.

This is where custom tailored EQ profiles come in. We will sit here and find out which frequencies your headphones don’t handle so well (and your ears are sensitive to) and boost/reduce them accordingly. This will create what is called a “flat” response, that is tailored to your unique ear/headphone combo. Which means that when we play a Lin sweep later there should be no perceivable increase in volume as the pitch changes. This will allow for greater clarity, a more realistic sense of space, and very little coloring of the sound when you play your audio. We can then take this EQ profile and either use it all the time, or use it as a baseline profile for further modifying your sound ie: bass boosting, etc.

Requirements

First we need to grab a few things. ### Soundflower Soundflower is a system extension for mac that pretty much allows you to pipe your system audio around. Download this and restart before you get started. ### AU Lab This app is bundled with Xcode normally. It allows you to record, add AU plugins, combine/split, and whatever you’d like to do to your audio real time audio. It’s essentially a blank swiss army knife that you can attach parts to. ### apQualizr This is a parametric equalizer plugin that allows you to apply different filters to different frequencies. Think bass boost, treble boost, high pass filter, etc. It is a bit pricey at ~$72.00 but it is one of the highest quality/easiest to use EQs that I have tried. They are also very responsive to support requests. It has a demo so that you can try things out if you don’t mind restarting the plugin every so often. ### MDA AU Plugins The TestTone AU plugin will help us sweep through frequencies later on and find the ones we need to modify. ### Headphones If you arent even sure where to start I recommend lurking here for a long while. Watch some youtube reviews, and make a budget.

Sony MDR-V900HD

For the sake of this tutorial I’ve grabbed an old pair of Sony MDR-V900s that I’ve had for ages. My experience with Sony is that some of their headphones can be pricey but the ones just under their top tier tend to fall in the “best bang for your buck” bracket. I’ve spent ~$150-200 over the years for these types of mid-range headphones. In the end I don’t really care about abusing them because of the price and they sound great after a good EQ profile is setup.

The EQ Process

Assuming you have SoundFlower, AU Lab, apQUalizr, and the MDA AUs installed it’s time to get crackin’.

Put on your nice headphones and get comfy, this may take awhile. First, set your system wide volume level to 50%. Then hold down alt/option and click on the volume control to set your output device to “Soundflower (2ch)”. This pipes your systems audio to Soundflower. Since Soundflower is now catching everything, if you had anything playing right now you wouldn’t hear it.

Now start up AU Lab. Choose “Stereo In/Stereo Out” on the left side under Factory Configurations, choose “Soundflower (2ch)” as your Audio Input Device, and choose “Built-in Output” as your Audio Output Device. The end result should look like this:

Your AU Lab Config

Once finished click “Create Document”.

If you have things setup right you can open up your favorite audio app and play some music and hear it. AU Lab should have some green bars dancing around and your hearing should be comfortable. If not adjust your volume to a decent level that you see yourself using a lot.

Now that you have AU Lab started, look in the output column. This is the column that will have all of your AU plugins on it and controls the audio played in your headphones. So let’s choose our first effect, the tone generator. This is the tool we will be using to detect peaks and valleys in our headphone’s response, and in our hearing. Watch out for this next bit as it will start a tone automatically and if you have your volume up too high it may hurt. Click on dropdown under “Effects” in the input column and look for the MDA plugin named TestTone. As soon as you pick it you will hear a steady tone of 997.0Hz, slide the level down to -40dB so you don’t kill yourself. Also slide the Frequency down to 50.0Hz. You should hear a growly tone, or may not hear anything at all if it’s outside of your headphone’s range.

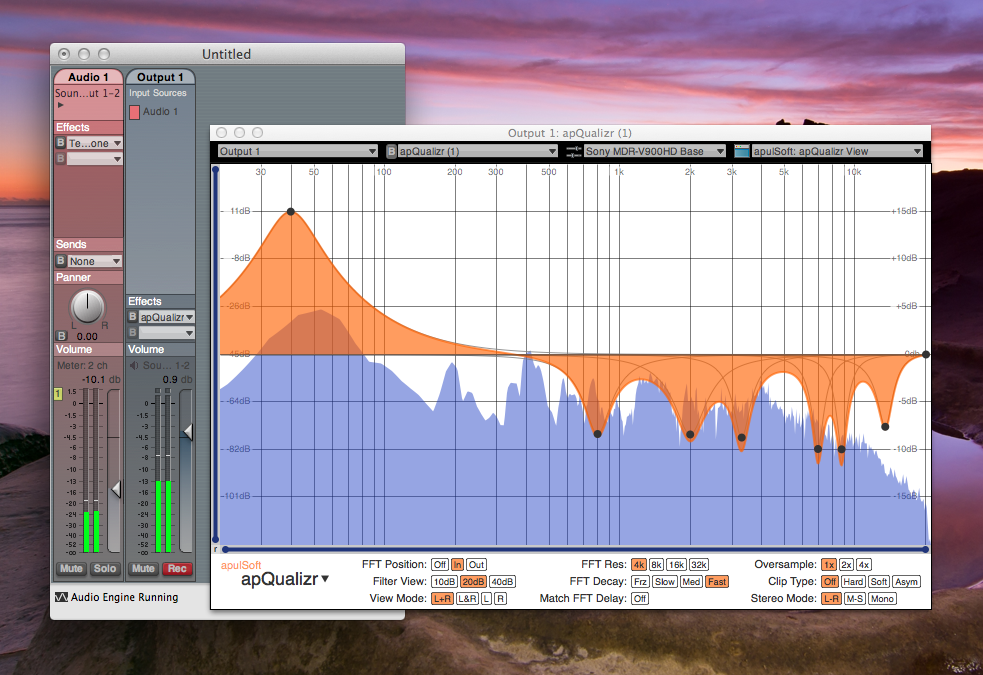
Now to see what apQualizr is all about. In the output column click effects and find the apQualizr plugin. Once it’s active you should see the apQualizr window open. If it is all blue then close the window and reopen it by clicking the effects dropdown and selecting apQualizr from the top of the list. If everything went well you should see the ToneTest window and the apQualizr window with a nice blue bulge at 50.0Hz like so:

EQ Setup

Now that we have this it’s time to play. If you jumped ahead and started sliding the frequency bar and up and down you probably noticed the blue hump chasing side to side in apQ. This is huge because we can now listen to frequencies and see exactly where we need to place our filters. No need to write the frequencies down!

Start by slowly sliding the frequency higher and if you notice what seems like an increase in loudness note when it stops getting louder and begins to get quieter. This is a peak. These are the buggers we are trying flatten. Once you find one slide back and forth to isolate it and find the center and click apQ on the middle 0dB line where that peak is centered and choose “Peaking EQ”. Later we will resize this peak to suit our taste but for now move along and find more of those bad boys.

My Flagged Frequencies

Once you have them all flagged it’s time to figure out how much we have to flatten them. Inside of ToneTest select “Pink Noise” from the dropdown. This will run a pink noise generator which we will use to gauge how much change occurs when we increase the size of an EQ peak. Go to one of the highest pitch peaks you isolated, and move it down until you notice that frequency fading into the rest of the noise. Don’t overdo it, we are just trying to dull down these sharp peaks. If you have a bunch it may be a good idea to turn off the pink noise every once in awhile and listen to some music as a break. This is the aural equivalent of sniffing coffee beans to clear your nose after smelling too much cologne at the store.

My Base EQ Settings

Once you’ve finished congrats! You now should have a pretty flat sounding EQ Profile. The hard part is done. Turn off Tone Test by removing it from the left column, save your profile by clicking the third column from the left in the apQ window and name the profile after your headphones. Most of your music should be pretty vibrant sounding. Now it’s time to customize things if you want. I put a nice boost at 40hz to make 808s and other bassy things have much more kick, but feel free to play with other areas to suit your tastes and music.

My Final EQ Settings

Note that brand new headphones need time to break in, and their profile may change as you listen to them more. Old ones may also change slightly as they age, or if they become damaged. All of that aside, a good EQ session can make previously average headphones sound great, boost the volume you can listen to things at, and increase fidelity in ways that are hard to describe.

I hope you enjoy your results.

Ok, for real this time  

Something like what's going on… I’m writing some posts right now. They aren’t in any shape to really publish yet. In the mean time check out my github, or maybe just getbot.

Houston  

be advised the visual is GO today.